Sunday, October 12, 2008

DRS Design Challenge #6


I made this card for the team that I design with,DRS Designs. The challenge was to make a card with a sentiment as the focal point of the card. I LOVE this sentiment as Autumn is my favorite season. I stamped the leaves with the easy background on watercolor paper and then I watercolored them in. I used a scallop edge punch for the sides and punched out the leaves from some cardstock. I adhered two of them and then I popped one of them up. I sponged the egdes of the cardstock ,added some dots for texture and put it all together.
I really encourage you to check out the DRSDesigns blog and play along with the challenge. If you do, please upload a link so we can see your creations! Also, upload to www.splitcoaststampers.com with the keyword DRSC6. thanks for visiting and have a great day filled with all of the colors of Autumn!

Friday, October 10, 2008

Coaster and Brown Bag Treat Holder


I made this little treat bag from 2 4 x 4 coasters and a small bag. This is SOOO easy to do and they are quick so you can make alot of them...


I took 2 4 x 4 coasters and put a 4 x 4 square of black card stock on the front. Then I matted the front with yellow and orange paper to match my design and my treat also! I stamped the image from DRS Designs and colored it with copics and glitter pens. I cut the bottom edge with the SU scallop edge punch and stamped the candy corn from DRS Designs aslo. I added the dots with embossing gel pens and a white gel pen.

I cut the brown bag down to 4 x 4 and adhered the coasters to the front and back of the bag. Next I got my handy dandy crop-a-dile, punched the holes and added eyelets and ribbon for the handles. I added some stickles and punched out 2 pumpkins with the Martha Stewart punch and added them
to the bag as well. This was made for a Challenge over at
Mothers and Daughters Creations. I hope you play along... this
was fun to do and I am sure it will come in handy for the upcoming holidays!

Thursday, October 9, 2008

A little wine ... a LOT of embellishments!!!

OK... so I NEVER drink and drive... but drink and stamp??? That is something totally different!!! I had a glass of wine while I was stamping and my creativity went a little bit overboard!!! I must have had my embellishment goggles on as well... because I went a touch overboard in the embellishment department!!! But... overall...


I think they came out pretty good. The stamps on the top card are from INKADINKADO. I love the look on the frogs face... and if we all just BELIEVE... well, ya never know...

The image on the bottom card is from Viva Las Vegas Stamps. There was a grab bag on Ebay for like $12... how could I say no... I got a HUGE variety of ALL types of stamps and this chick was in there. I love all kinds of stamps and that is totally what I got. If you need a certain stamp and think you will never find it... go there... I am willing to bet they will have it. Some of the stamps are not for the faint of heart... let's just say they have something for everyone! I hope you enjoyed my cards for wacky wino Thursday! Have a great night and a glass or 2 of vino...then go and stamp... don't forget the embellishments!!!

Sunday, October 5, 2008

DRS Thanksgiving card and my darling Ava's 4th Birthday...

I love this image from DRS Designs. I knew it was going to call for copic markers,crystal effects and some sponging...so I kept everything else pretty simple.I used SU cardstock and designer series paper, and for fun... a little bit of ribbon!

DRS Designs have some really GORGEOUS stamps for Thanksgiving and for the Christmas holiday season!They also have some completely darling snowmen stamps! I am a sucker for snowmen... so wait and see if you don't become one too when I am done creating my cards with all of them!!!

Well... thanks so much for looking at my card. I have SO MUCH to be thankful for already! It was my darling Ava's 4th birthday today and my darling Momma was able to make the trip to be here to celebrate with us!We have been so very blessed!!! I just felt like a Thanksgiving card was what my blog needed today! Thanks for stopping by...

Friday, October 3, 2008

Aloha!!!!


I have had this little stamp for a while and this paper was BEGGING for it!!! I used a sketch challenge from Mothers and Daughters Creations Challenge blog and got out my new SU designer paper and came up with this little beauty! I love love LOVE the color combo... ( I just followed the colors from the paper) and the sketch was pretty easy to follow. After I stamped the image and colored it with copics, I added the sky and the beach. I colored her outfit and her lei with markers and glitter pens. Then I got out the gel pens and the prima flowers and embellished the daylights out of this card!!! I also love that the image looks like a tattoo!
The ribbon colors match the designer paper colors and the whole thing just kinda works! I had NO idea what I was going to come up with... but this little wahine showed me the way! I hope you enjoy this card as much as I did... ALOHA, Y'all!

Thursday, October 2, 2008

Witchy Bella Keeps Poppin 'up!!!


I could not RESIST the Challenge over at Mother and Daughter Creations blog... to make a card that moved or popped up. I KNEW I had to bust out my Bella, my glitter pens and some Halloweenie spangles and show them what I've got!!!
I made a free standing pop up card and have included the two photos of it... one popped up and one closed. Tis was a wonderful tutorial over at splitcoaststampers.com. It was super easy to make and really fun to embellish and color in! The best part is ... it folda FLAT for mailing! How fun to make and send a little Halloween greeting that stands up for itself!(LOL!)
I love stamping and making cards...but the ones that move and pop up just have that extra WOW factor! Hope you enjoy this card!!! Check out the tutorial and see how easy it is to create one of these for yourself!!!

Halloween Pumpkins in the Moonlight!

I made this small card using the All Hallow's Eve stamp set from Inkadinkado. It was really easy and inspired by Zindorf... the goddess of everything brayered! I did use my sponges for the background and the sky...I stamped the pumpkins and colored them with copics. I embossed them with clear embossing powder. Then I sponged the background with greens and blues... and a little bit of black in the sky. I embossed the spider webs with black embossing powder and highlighted them with glitter pens. I highlighted the pumpkins and the vines with silver pen and then I added the moon! This was super easy and fun to make! Break out the sponges ladies... and get creative! they are fun and YOU WILL get your fingers dirty!!!

Wednesday, October 1, 2008

Gimmie some SUGAR NELLIES!!!


I have had these Sugar Nellie stamps for a while and was never inspired to use them... UNTIL... Sweet and Sassy Stamps put out a design team call... so I busted them out! I made 3 cards with the three stamps that I had and had a great time using these little guys! To me, they called for soft colors, patterned paper and lots of razzle dazzle by way of stickles, glitter pens and embossing pens!
I also added the clouds and the grass softly in the background so he would not look like he was floating in mid air...(I always have to remember that!!!) I got carried away with my edge punches and had a great time doing it! I just let my creativity go and here is where I wound up!!! I am pretty happy with the way this little guy and his buddy turned out! I am glad i got him out of the drawer...so My message for today is CHECK YOUR DRAWERS... You never know who you might find in there!!!(LOL)

Sunday, September 28, 2008

DRS Challenge:Bag Topper and Matching Gift Box Tutorial

Well, Here is it... MY FIRST EVER TUTORIAL!!! Please leave some feedback for me and let me know what y'all think... here we go!
These are the supplies I started with. SU cardstock, a plain paper bag and box from the craft store .The bag is 8 x 10 inches and the topper is 9 x 6 inches...
After I cut the 9 x 6 paper, I folded it in half and laid it on the bag to see where it would look right... then I measured in 2.5 inches from the right and 2.5 inches from the left. I put a dot at each measurement to get ready to cut the slot for the handles.

I cut down 1/4 inch at each dot and then connected the two cuts with my paper cutter. This will allow the handles of the bag to fit through the slot.Next, I randomly stamped the pumpkin image from DRS all over the front of the bag topper
Then, I cut two ovals with my nesties in coordination colors,
stamped my sentiment on the yellow one and used my embossing and glitter pens to decorate the ovals.

I got out my trusty crop-a-dile and set copper eyelets in the front and back of the topper to allow a place for ribbon to be tied! Here, I used large copper eyelets.
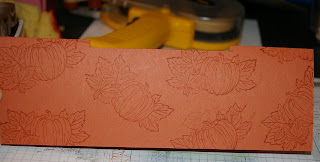
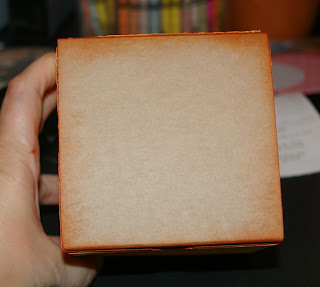
I inked the edges of the box with orange ink so when my paper is on the box, it will blend in and match a little bit better. I also think it looks more finished this way! I ran the paper for the sides through the cuttlebug and inked the design with orange ink to show off the embossing on the paper.
I stamped this gorgeous image from DRS on the front panel and colored it with chalks... I LOVE this image and how Fall like it is! I can smell the turkey roasting and the cider mulling!!!

AND... here it is! I hope you like it! This is SOOOO simple to make and this way I don't have to used tissue paper in the gift bag.(I NEVER can make it look right!) I really like how the box and bag coordinate and I think this will make a lovely gift to present to your Thanksgiving hostess or anyone you are thankful for! Think how darling this would look for Christmas as well! Enjoy your day!


Friday, September 26, 2008

Cheers to Friday!


This card is pretty straight forward. I cut squares and mounted them on green cardstock to accent the patterned paper. I stamped the images on them and colored them with copics. For texture and fun , I added crystal effects in the drink part of the image. I highlighted the straw,the stirrers, the umbrella and the bubbles in the champagne with glitter pens. I used my cuttlebug to cut out the ribbon slide and punched out the circle. I used a marker to ink the word "cheers" and put that in the circle.
This was a really simple card that was quick and fun to make. I love the look of the crystal effects... it makes the drinks look shiny and wet...REFRESHING!!! And as for the glitter... well... what can I say??? That is the best part! Thanks for looking and may your champagne ALWAYS be bubbly!

Wednesday, September 24, 2008

Primas, Patterned Paper and Polka Dots!


This was for SCS sketch challenge number 175. I keep a binder with all of the sketch challenges in there so if I get a "block" I can unclog by looking at the sketches! I just printed them out and put page protectors in a 3 ring binder and I keep adding the new ones.
This was a really fun one to do... I think because I never use circles! I cut a piece of patterned paper and them stamped this image from SU Garden Silhouettes in black. I cut out my circle and cut it in half, inked the edges in black and mounted it on the black cardstock. I inked the edges of the patterned paper and adhered that as well. I then took an embossing pen and added all the dots! I punched out the 6 circles and put black brads in the middle of them, then I added the ribbon and the flowers that I layered.
And there it is ... my SC175... I hope you like it as much as I do... it is kinda artsy for me... but I DO love the look... just had to get outta the box!!! Now you all, it is your turn... get out of the box and lets see what ya got! thanks for stopping by!

Tuesday, September 23, 2008

SPOOKY CORNFIELD!!!!!


I made this card with stamps from DRS designs. I used my brayer and a spectrum pad for the background. I brayered the sky on glossy cardstock then inked the edges in black. I stamped the tombstone on grey cardstock and cut them out and inked them for some texture. I stamped the cornstalks onto the glossy cardstock. Be careful when doing this... glossy cardstock can be slippery!!! Just stamp up and down...dont wiggle or rock the stamp... it will not have a crisp image. I arranged the tombstones on the cardsock and them trimmed the edges off. I used pop dots on the one in front. I used my white gel pen for some highlights and added black dots around the outside of the card...for fun!
I stuck the bat on with glue dots... he is sparkly and adds just the right SCARY touch! (and puls... I am pretty batty myself!!!) Hope you like it!

Monday, September 22, 2008

Halo Bella... You're an angel to me!


Simple card... not real tricks here... but I just love how soft this looks! I have been crazy creating things for fall,which I LOVE, but I was craving some softer colors. I used stickles on the wings, colored her with copics and cut the pink rectangle with my nestabilities die.
I love the hopefulness in the sentiment... I don't know about you... but that gives ME all the hope I need! Angels ARE waiting on your prayers... and look how happy she is...
ANYWAY... have a hopeful day... and know that someone IS awaiting your prayers...SO PRAY ALREADY!!!

Thursday, September 18, 2008

Water color leaves...


...so easy and fun!!!
I stamped the leaves background from DRS on watercolor paper with waterproof ink. This background stamp is super easy to use because you don't have to try and line anything up... it always just seems to work. I love all of the background stamps from DRS... have a look at them!Then I water colored them in and cut them into squares. I had to ink around the edges of the squares, cuz that is how I roll... LOVE INKING EDGES!!!It just "finishes" the look...
Then I matted the squares on yellow card stock. I used my cuttlebug embossing folder on the green paper. I stamped the sentiment on white... INKED THE EDGES... AGAIN and mounted it on yellow as well. I tied two different organdy ribbons on the bottom of the card for some texture.
This card makes me want to stay at home and have hot cider! The leaves in Charlotte don't really change till like November... so I just had to create my own... and what fun it was!

Tuesday, September 16, 2008

DRS pumpkin shaker card...


This is a card that I made with the new DRS Halloween stamps. The pumpkin is a current stamp... but the sentiment is a new release and available for purchase beginning September 15th. Oh wait... it is the 16th... what are ya still doing here? do to DRS and get the new Halloween stamps... I will wait...
OK... got what ya "need"? Let me tell you about this card. It is a shaker card... how fun is that? I removed the eyes, nose and mouth from the pumpkin and put a piece of acetate behind there so the goodies would not slip out. Then I used some double sided sticky foam tape to seal in the shaker stuff and adhered it to the card. If you take a look at the other picture... you can see all the stars in Jacks eyes... I think her loves Halloween as much as I do!
I colored the pumpkin with Copic markers and I sprayed some ink to make him look a little bit speckled... then I inked the edges of all of the paper and assembled it! Hope you enjoy it...

Monday, September 15, 2008

A raondom stamp,10 minutes to myself and copic markers


I have no earthly idea where I even GOT this stamp from, but I loved the "retro" look of it AND I know it was on sale! I used my Copic markers to color the ornaments in, and added some extra dots to it just to make the wreath fuller. Then I colored the bow, added some glitter with a glitter pen and mounted this on mulberry paper with gold and silver foil bits in it. I mounted all of that on SU brushed silver cardstock and added the little gems in the corner. I LOVE how this came out AND the fact it was super easy to make! I need to get a jump on my Christmas cards as it is not THAT far away!
Have a great day ladies... and ALWAYS look in the sale bin...

Sunday, September 14, 2008

DRS Challenge number 4...ATC to Full card!


This card was made for DRS design challenge number 4. A while ago, we all made ATC cards and then saved one of them. The Challenge this week was to make the ATC into a full card... so here is mine! I used the blue cardstock for the back and sponged the edges in blue and then black. I used the flower die cuts in the corners and a large scalloped oval for a matt for my ATC.Then, I got out the white gel pen and carried on the dot theme.I am really pleased with the way this turned out! If you would like to play along with this weeks challenge... even if you don't have an ATC laying around... PLEASE do! They are fun to make and it really challenged me to get every element I wanted onto the small 2 1/2 inch by 3 1/2 inch space. Then trying to incorporate it into a full card and carry on the themes... ANOTHER challenge for me!!!
This was really fun to do and we hope that you will play along...
Check out DRS designs blog for the details and to see what the other designers did as well! thanks for stopping by!

Sunday, September 7, 2008

an Inspiration... with a little DRS twist!


I Love the chalkboard technique and I loved the image on the tutorial on Splitcoaststampers.com, so I put a DRS spin on it!
I used images from DRS, the butterfly,the "Hello" and the branch. I copied the colors and the layout from the tutorial and here is what I came up with! I really like the color combo and the layout of this card. This technique is so easy and fun to do! When you put the chalk ovet the white craft ink... it is like MAGIC!
I enjoy the techniques and how creative you can get with them... I just enjoy anything stamping... it is my Passion...
Well, Y'all have a great night and a better tomorrow. Thanks for stopping by!

Thursday, September 4, 2008

Pearl-Ex and Primas and Polka Dots!!!


Well... that about sums it up! I NEEDED some color in my day and I will say that is JUST WHAT I GOT!
I knew I was gonna use this stamp from DRS designs to make a bold,bright fun card... so I put my thinking cap on and here it is!
I dug out the Pearl-Ex,versamark ink, some brightly colored paper and just had a hey day! I cut the pink and green cardstock with my Nestabilities and for the yellow and the black cardstock, I just used my cutter. I stamped versamark ink on the green triangles, the black background cardstock and the butterfly image. Then I took some Q- tips and Pearl-Ex and just started adding color by swirling onto where the versamark was stamped. When I was done adding the color, I used a Swiffer sheet to wipe away the excess Pearl-Ex. (... and YOU thought they were just for cleaning! My hubbie thinks I am cleaning because we go through so many of them...)
To get the tri-color look for the butterfly , I started in the center with the yellow, added the pink and then put the green on the outside. I got out my white gel pen and added the dots all over the scallops. I used a glitter pen for the corners...gotta have my bling! For the last added touch, I layered 3 primas in matching colors, put a fun brad in the center and adhered it to the card! This was just so summery and fun for me! I love the Pearl-Ex shimmer and the bold design of the butterfly really shows it off well.
I hope this added some color to your day...so go forth and be shimmery!

Wednesday, September 3, 2008

No Orange on THIS Halloween card!


I have had this skull image for a while and I thought of a way to use it! FINALLY!
I embossed it with pale pink embossing powder,used my circle and scallop punches form SU and some fun ribbon that I "found" in my craft room. (Things are never really lost in there... just piled on top of!) I used one of the new CB embossing folders and added the sentiment. I sponged over the web with some silver encore ink. I added dots with embossing pens and jellyroll glitter pens and there you have it! I wanted to make something for Halloween with any color but the usual for Halloween... Orange,green and purple. I had to have the black... but the pink really puts it out there! Try to do something out of the norm today... I love the feeling of BEING DIFFERENT! You never know who you will inspire!

Monday, September 1, 2008

My first EVER artist trading card...


...well, what do you think? I thought it would be impossible to make one of these given the space, 2.5 inches by 3.5 inches. So I put my thinking cap on extra tight, got out my DRS stamps and went to work. I chose image number K662 and just used the large flower. Here is what I came up with. i colored the image with copic markers, added some velvet ribbon and my first ever ATC was born! I used my nesties for the scalloped oval, my Marvy punches for the other ovals and then i pierced the daylights out of this! I used a teeny little nestie for the small "hello" oval and added a rhinestone in the middle of the flower. This was fun to make and I really had to challenge myself by making something so small. If you want to play along, Check out DRS Designs blog for their challenges and see what you can do. Be sure to post a link so we can all see your creations! thanks and have a great night!

Saturday, August 30, 2008

So THAT'S how you make the 3-D stars!!!


No need to get a pattern,or a template... just our favorite thing! A RUBBER STAMP!
This is a new Christmas release from DRS designs. So easy to use and the result is stunning! people will think you spent HOURS on this star... but it is literally minutes!
Just stamp the Christmas tree punch star image (I embossed mine with gold detail embossing powder) and then cut it out of the paper...Score the short lines on the front and the long score lines on the back... a little fold here and a little push there and voila... the gorgeous look of 3-D stars in NO TIME AT ALL! You all need to have this stamp in your collection... even beginners will look like the pro's with how easy this is to use.
I used dimensional glue dots to secure mine to my card front... but you can poke a hole in the tip of the star,add an eyelet and hang it from the card with ribbon... or even use this for gift tags or ornaments... they are just so easy!
Have a great weekend, Y'all and in honor of Labor Day... take a casual stroll over to DRS and check out how truly labor free this stamp is!

Wednesday, August 27, 2008

I LOVE these Eat Cake stamps!


I have already posted 2 examples of cards using their designs below... but here is another one! If a hippo can fly... then why not me? Just believe I guess. That is the message I was trying to convey in this card... and if I must say so... I BELIEVE I did! I Used a sketch challenge from SCS and just kinda played around with the colors. Here is what happened when I had NO plan at all... I just love the way this turned out! I used my COPICS for the darling hippo, Stickles for the wings, white gel pen for all the dots, scallop punches and the SU corner punch (one of my FAVE punches from them!)I hope that this will inspire you to have fun having no plan and to just go and play around with tools and stamps... and keep stamping fun! I BELIEVE you can! Enjoy!

Sunday, August 24, 2008

Eat Cake... My favorite thing to do and some of my favorite images!


This line of stamps... Eat Cake... was just sitting on the shelf in the LSS minding its own business... but somehow calling me to come hither! Well, hither I came, tither went my money and yon ... here are the cards! (What IS a yon anyway???) I stamped the images in Brilliance Black ink so that my Copic markers would play nicely with the ink and not make it run... and of course used my Copics to color them in. I added some stickles here and some designer paper there and here they are... Super cute and really simple to make! I love the one with Paisley Jane on the Snowflake... but the "Main Squeeze" image just makes me giggle every time and winds up being my stamp of choice for anniversary cards! I hope you enjoyed looking at these cards... now... go and get some cake... and then go and check out their website!
Enjoy!

Thursday, August 21, 2008

POLYSHRINK... Where have you been all my life???


ok... not ALL my life...I did use it when I was uhhh...younger...but forgot about it and NEVER did I think I would use it on cards... was I WRONG! I got a new stamp from DRS Designs, this cute little snowflake ribbon slide, and remembered one of the other talented design team members had used it on her card and a light went off. Where was that stuff??? Well, I dug it out, stamped the snowflake ribbon slide with white stazon and cut it out of the plastic. I used a horizontal punch to make the slide holes... DON'T forget the holes! Then I got the heat gun and got TOTALLY freaked out when it started to shrink... but lo and behold, it came out perfect... so I made a few more. I strung them on some silver cord and added them to the front of the card. I embossed shiny cardstock with snowflakes and sponged ink on the snowflakes so they would show up. I also stamped the snowflake ribbon slide on some paper, cut the holes and added some ribbon. So there you have it... I hope you like this card... it was really fun to create!

Wednesday, August 20, 2008

LOVE!!! I love LOVE with LOVE!!!


I did this card for the SCS layout challenge number 184. I used Chocolate chip and purely pomegranate card stock ( a color combo I LOVE) and berry bliss DSP all from Stampin up (love SU!!). A few cuts here, a few cuts there and voila...MY CARD! I used my copic markers (guess what ... LOVE them) and my glitter pens for highlights...(well you get the idea). I LOVED this challenge for the layout... I know I would NEVER have some up with something like that! thanks for sharing... now go on... spread the LOVE!!!

Monday, August 18, 2008

Piercing and Snowflakes and Acetate...OH MY!!!


I made this card for the DRS design challenge today! The challenge was piercing and it was a good one for me because I never use piercing... but should! It adds so much to a card with so little effort! I cut my card stock and inked the edges of the pink card stock for some depth. Then I stamped this image from DRS designs, image F875, and pierced the swirl. I pierced the edges of my cardstock, adhered it to the acetate and added the ribbons. I had the snowflake in my stash and i think it adds the right touch! I have a hard time making cards that are not really "busy" so it was a double challenge for me... piercing and simple! Well, here is the result... I hope that you love it and will play along with the challenge, just don't poke your eye out! (LOL)

Sunday, August 17, 2008

WATERCOLORING!!!


I made this card with that Purely Pomegranate AGAIN!!! I also used Berry Bliss DSP and Watercolor paper... I watercolored the image and added the ribbon... pretty straightforward... but a pretty card that I just had to share... i hope you all love it!

Thursday, August 14, 2008

Shade or Lantern...


I found this idea and knew I had to try it! I used Pretty Peony, French Script and Canvas from SU. I stamped the image and then I ran it through the crimper. I then laid it face down on a dark ink pad so the crimps would be highlighted. I thought it looked like a Chinese lantern or a window shade! So quick and easy and i LOVE the overall look of the card! I am starting to notice that all of my cards are starting to look a little bit the same to me! I seem to love the Burgundy and Brown combo with a hint of green... So I am going to break away from this and see what i can come up with... It is hard to change when you find something that is working so well! I love the richness that color combo gives... It feels warm to me! Have a great day today and a more colorful one tomorrow... I know I am planning on it!

Tuesday, August 12, 2008

Here is how cool I am!!!


I made up my own color challenge... I used Bashful Blue and Groovy Guava... and a stamp set I had not used before. I stamped the flower in the blue and in the Guava and cut it out and layered it. I secured the layers with a rhinestone brad. I used a Sketch Challenge from SCS and assembled my card. Pretty straight forward. I colored the bird with copic markers and for once in my life... I DID NOT use a background stamp anywhere! That is a biggie for me as I love to use background stamps!
Challenge yourself today!!! I was amazed at how totally cool I am!!!

Sunday, August 10, 2008

It wasn't perfect for me, but


... someone liked it! I made this card with a Michael's sale stamp that I had to have...(just like all the others), my Copic markers and LOTS of clear embossing powder!!!I Colored the sun image and embossed it. Then I brayered over it with So Saffron SU ink. I clear embossed the swirls from Priceless and THEN went over the whole thing with black ink. I LOVE the way it turned out... and then I had to stamp the sentiment on the bottom and that is where it went bad! I got the darn thing crooked...RATS!!! I took it to my salon anyway and someone must have loved it because it was gone by the end of the day! One man's trash... I guess!
I guess beauty and perfection is in the eye of the cardholder! Have a perfect day!

Friday, August 8, 2008

I love this idea!


I am sure I am not the first person to do this and don't even know who to give credit to because I have seen so many of these type of cards... but I LOVE IT!!!
I used the spiral punch for SU and the Wild about you set from them as well and created this fun little card! Since I have a daughter and she is going to a birthday party a weekend... i am always challenging myself to make cute cards for children, especially the boys... and I really think this fits the bill! It was a fun card to make and makes me smile every time I see it!
Thanks for stopping by!
Dawn

Thursday, August 7, 2008

Stamping and Sewing!


I love this flower image from DRS Designs! To me... it looked like stitching... so I went to the craft room for some inspiration! I uses bright Copic markers in pinks,greens and oranges to color the image. Then I cut bits of ribbon and sandwiched it between the pink and the orange cardstock and went to the sewing machine! I stitched the ribbon in place with bright green thread and mounted it on the front of the card. To finish off the flower, I HAD to use a button... to continue my theme! On the flower petals, i highlighted the colors with the colorless blender from Copic and used a glitter pen to dot the petals and the leaves for a little added sparkle. I really encourage you to check out
DRS Designs for some really wonderful stamps and some great ideas from all of the other talented stampers! Thanks for looking and have a great day!

Tuesday, August 5, 2008

LOVE this color combo!!!


I got this set from SU and was looking in the gallery on www.splitcoaststampers.com for some ideas and came across this one that I had to copy and here is my version... click on the link to see the original... I love the layout, the colors and the stamps... I just had to try and make my own! Try going to the gallery on splitcoast for some inspiration and see what you can do with the colors, the layout and the stamps... maybe use a few favorites of your own! AND... be sure to give credit to the original artist for inspiring you! Have a great day

Monday, August 4, 2008

DRS Design Challenge


INCHIES!!!
I created this for the DRS Design Challenge. I used the stamps C685 and G663 From DRS Designs.
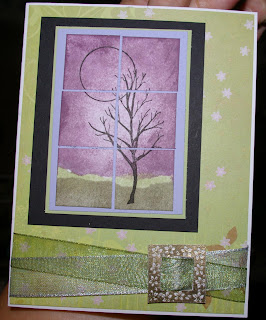
I sponged a piece of 2 x 3 inch paper with purple and green inks to create the background. Then I stamped the tree image and cut it into 1 inch squares. I layered the mosiac image on the lilac paper, then a small border of green and then black to really make the image pop.
The ribbon slide embellishment is a stamp... can ya believe it??? I stamped the ribbon slide stamp in versamakr and then embossed it with gold, cut it out... added the ribbon and there you go! A really affordable way to use embellishments on your projects and the best part is that you can use this embellishment over and over again because you MAKE them with the stamp!!! You can also make the ribbon slide any color you want to match your projects by embossing, watercoloring or using markers to color it! COOL, huh!!!
Well... I hope you like the outcome and that you feel inspired to make some inchies and have fun with them!

Friday, August 1, 2008

FAIRYLAND!!!


I have had this SU set FOREVER!!! I HAD to have it and never used it... Well, I MADE myself get it out of the closet and do something with it...
I stamped the image on marker paper and got out the copics. Colored the images and looked for a Sketch Challenge that would work with the picture I made... this was SC41. i had made the swirly paper in the background by using the shaving cream technique and i had THAT for a long time too... i just could not throw it away. Well, I must LOVE that color combo because I think the fairy and bird image match pretty darn good! I started layering the papers, got out the air tool and corner punch and put everything together. The purple paper in the background is pre-made paper that I had nothing to do with other than buying it, adding it to my stash and finally getting a chance to use it! I used glitter pens for the sparkle and then I added the gemstone flowers on the bottom. I hope ya like it! thanks for looking and have a magical day!