Saturday, January 30, 2010

Hello Inky Ones...

My SCS blogger group. You all KNOW who you are...and I owe each of you an apology. I have been a bad commenter and I am so sorry! So today... My hubby watched the kiddos and gave me a well needed break and I added you all according to Gale's blog list. I am back and I WILL be commenting... I have missed the "love" and I have missed the inspiration that you all give me. So forgive me and look for me... I'm baaaaaaaaaaaaaack!!!!
And... BIG props to Gale... You have been a wonderful and faithful commenter and I really appreciate it. You have been my constant in my crazy ups and downs.
I love your picture... That sunny smile lifted me when I was down... REALLY down. Thank you!
AND...for all of you that sent sympathy cards when my mother passed and gifts and cards when we adopted our gorgeous son...how can I ever begin to thank you all.
The Kindness of strangers is amazing... You will all never know HOW MUCH that meant to me and my family...Thank you again... from the bottom of my heart...

Friday, January 29, 2010

Copic Color Challenge...and ART IMPRESSIONS


I love this little cupid from ART IMPRESSIONS. He looks so determined to get the love match made! I used the color inspiration from the copic color challenge and I used SCS sketch challenge number 211. I punched out the hearts with a SU punch and then I cuttlebugged them for texture and added some darling bows that I made MYSELF (believe it or not) with the Bow Easy.Trust me, I CANNOT tie bows without using it. They are available at my friend's store... so check them out... worth every penny in my opinion! So anyway... I LOVE the way this turned out... not your typical Valentine' Day colors... but with Cupid and the hearts... I think you get the idea!!! Thanks for stopping by and be sure to check back as I will have another post today featuring my DRS 3 d item...You won't want to miss that!

Wednesday, January 27, 2010

Another MOTIVET Sketch Challenge...


...LOVE these stamps! I LOVE coloring and these little darlings let me do just that! I colored this little gal with copics,of course, and then I followed the sketch that can be seen here... this is a short post as I need to go and get my little princess from pre school and my little prince is none to happy right now! I hope you enjoy the cheerful colors on this fun get well card. Thanks for stopping by!

Sunday, January 24, 2010

Paper Makeup's Melody in 2 Challenges!

I used Paper Makeup's Melody in the Die Cuts R Us sketch challenge and the copic color challenge. I LOVE this little fairy and the birdie that she is singing to is so sweet! This color combo made me feel very springy so I got out the flower soft and the butterflies and away we went! I added the calla lilies around the oval frame and then I used the butterfly die cuts to fill in and make the oval that was shown in the sketch that can be seen here. I love doing challenges and I have over 200 copic markers... so I am always looking to pout them to good use and the copic color challenge lets me do just that! I LOVE to color and going to copic certification really helped me learn how to use the colors that compliment and contrast to make the best of the markers and the images that I am working with! I used Shimmerz on her wings and on some of the butterflies
for the embossed areas. Thanks so much for stopping by today and have a wonderful butterfly filled day!

Friday, January 22, 2010

Art Impressions Pearly Swirly Snowman!

I made this card using a little snowman from
ART IMPRESSIONS. I stamped the snowman in the corner and I colored him in. Then, I used my versamarker all over him and embossed him with clear embossing powder. Next, I tore a piece of paper and sponged the "snow"(click on the pic for better detail). I stamped the swirl background stamp and clear embossed that. Then I used blue all over the paper. Next, I stamped the swirl background again and inked all over it with the purple that I used for the sky. I had this lovely pearl swirl embellishment that I added and tied this killer bow and placed a few snowballs buy my little snowman and here it is! I hope that you enjoyed this card... I love doing emboss resist because of the fun look that you can get that is SOO easy to do! Thanks for stopping by!

Monday, January 18, 2010

What a Little Cutie Pie!

This little cutie pie kid is from DRS DESIGNS... and he is PERFECT for Valentines day! Their whole line of Cutie Pies is darling and there is a cutie pie for EVERY occasion! He is so sweet and shy with his little flower for that special gal. I LOVE the precious look on his face... so sweet. I colored this image with gamsol and Faber Castel colored pencils for a soft, pastel look. I used my nesties for the hearts on the front and the shape of the card as well.I used gel pens and glitter pens for the accents and here is my sweet, simple card from DRS. I hope you love it ans stay tuned for another fun card from DRS DESIGNS tomorrow! Thanks for stopping by!

Sunday, January 17, 2010

MOTIVET Sketch Challenge...

The challenge this week at Motivet was to use a sketch challenge to make a card using one of the images that they sell. Well, I got this little cutie a while ago and now I had a chance to use her and all of the new COPIC markers that I just got! BIG SMILE! I love coloring as it really relaxes me and I think of nothing else! I chose some fun patterned paper and used SU card stock to match it all up! I even busted out the crop-a-dile to set the large eyelets...so glad I still remembered how!
I used my su word window and new label punch and i added the sentiment JUST BECAUSE... a SU rub on. I thought that was perfect... because I made this card... just because!
I punched the scroll in the corner with a punch
I have had for a while and I added the velvet
leaves because I LOVE the way they matched!
The little orange rose was a great finishing touch!
I added the crystal swirl in the corner for some balance and here is my card! I wanted to show a close up of the detail in this gorgeous stamp. for the trim on the jacket, I used liquid applique and added stickles over that! So that is my entry and i hope that you will all like it... and Please stay tuned for a really fun birthday card from DRS DESIGNS tomorrow! thanks for stopping by!

Thursday, January 14, 2010

Die Cuts R Us Christmas Leftover Challenge.

... This was easy... the Die Cuts R Us Blog had a great challenge on their blog to used Christmas Leftovers in your project. I have a TON of leftovers... from MANY Christmas projects... so it was fun to use them in a productive way! I used A Miss Anya Stamp from The Greeting Farm and used my Copic Markers to color her in! Then I added liquid applique and stickles to her boots and coat for a sparkly fluffy look! I used some fun felt snowflakes that I had. I didn't have green... so I used my copic markers to color one the color I needed. Problem Solved!I had some awesome brads that matched the paper and some lace and ribbon that went really well with my card... so on it went! I stickled everything and stamped the sentiment and I am really pleased with the way this card came out. Please be sure to check out the Die Cuts R Us Blog to play along with this challenge and the Die Cuts R Us store see all of the awesome products that they carry ... AWESOME one stop shopping! Thanks for stopping by!

Paper Makeup Blog Hop Day...Come and Hop with Us!!!

Well... Thanks so much for coming to my blog and If you got
here by chance, please take a minute to go to the Paper Makeup Blog to start the hop. Each member will have a letter and you visit them all.... collect the letters spell the message and you will have a chance to win some great prizes! There is also a release party tonight in the forum at 8 pm. Please note that I do NOT have a letter to look for... so I am a freebie!


I used this sentiment form the collection of Happy Birthday word art collection and I LOVE IT! I think it fits the bill perfectly for men or women depending on how you decorate the card and what colors you choose. I love versatility in a stamp! I used some 3 D embellishments that you layer by adding pop dots to certain parts of the design that you cut out. The look is stunning and SIMPLE!!!

The next stop in the hop is our wonderfully
talented Tangi . She will have some another
wonderful card and your first letter in the Phrase. Thanks for stopping by!


Wednesday, January 13, 2010

Followers...I got a new gadget for ya!

I am having a really bad time with my followers gadget from blogger...ARRGHHH!!! It WILL NOT show any of my lovely followers. So, please check out my new gadget and please click to follow me that way. Thank you all and know that I appreciate it! Stay tuned...you won't be disappointed!

Paper Makeup Sneak Peek Day 3

This is by far my FAVORITE word art from Paper Makeup. It reads,"Sometimes God calms the storm, and sometimes HE lets the storm rage and HE calms HIS child." OH what a sense of peace that gives me! It reminds me that things can be crazy all around me and I can still go on with my day and remain calm... with HIS help of course! I used my nesties to cut the plain and the scalloped ovals out. Before I popped out my white oval, I sponged it with pink to match the other paper I used. I cuttlebugged my pink paper and sponged all of the edges of the other paper to add some softness to the edges. The rhinestone swirl on the bottom corner helps balance the chiffon bow. The soft look of this card compliments the sentime so nicely. Please be sure to stop in tomorrow for the BLOG HOP and a chance to win the whole new release from Paper Makeup... See ya then!

CUUUUUUTE KITTY!!!

I LOVE this darling little Kitty from DRS... and I thought
she would make the perfect shaker card and I was right!(lol). I stamped the kitty and colored her with copic markers,gel pens,and glitter pens.Then I put the shaker card together. I thought the confetti was really cute too. You cant really see it here... but there are butterflies and smiley faces! I thought that was pretty cheerful! This sentiment is soon to be retired... so get it while you can... but I thought it was perfect ... for me anyway!!! Please make sure to check out DRS DESIGNS for a complete list of retiring stamps and get them while you still can! Good news on this darling kitty... she is new and she will be here for a while! Thanks for stopping in!

Tuesday, January 12, 2010

Paper Makeup Sneak Peek Day 2

Here is my sneaky peek... Bobo the clown!!! And... I think he is just precious!!! I love the balloons and the happy look on this little guy's face! I colored him with copics and added the clouds in the background with a stencil. For the accents and highlights, I used gel pens and glitter pens. The 2 glitter buttons on the bottom tie all of the colors together nicely as well! I LOVE coloring in balloons now that I went to copic certification and found out how to give them the see through look balloons have... LOVE IT!
Stay tuned to the blog for the rest of the week and see more peeks AND on the 14th... you can do the Paper Makeup blog hop for a chance to win the WHOLE RELEASE!!! Stay tuned...

Monday, January 11, 2010

DRS Simply Sweet Snow Lady!


After the Christmas and Holiday season... it seems that there is a lull... but for me... I bust out the snowmen stamps, or in this case, the SNOW LADY! She is one of the many new darling NEW RELEASES at DRS DESIGNS stamps! I die cut 2 blue circles for the front and back of this card and 2 white scalloped ovals. I mounted the blue to the white and then I added the Warmest Wishes sentiment to the front by embossing it and making sure the white would really pop. Then I added the gemstone snowflakes and the snowflake brad. The brad makes the card open by sliding the front down so you can read the inside of the card as you can see in the next picture.

On the inside of the card, I cut another circle with a pointy edge die cut. I colored the snow lady with my copic markers and for the snowflakes on her hat, I used my glitter and gel pens to add some fun sparkle. the best part of this card is not only the awesome stamps and the fun shape... but it will fit into an A2 envelope so that you won't have to pay
extra postage! I hope this will inspire you to try a fun
shaped card and beat the January lull! Thanks for
stopping by!


Sunday, January 10, 2010

These Girls Put the BOMB...


... In BOMBSHELL! A while ago... a friend of mine sent me some images of these luscious ladies from BOMBSHELL STAMPS and I had not gotten a chance to play around with them.WELL... I finally did and what fun!!! I love to add texture to my cards use and various papers that really scream for attention and I was able to do that... and it still looked GOOD!!! For this first one, I colored her in using copic markers and then I cuttlebugged the diamond plate texture on hologram paper. I used my nesties for the background shapes and then I added this glittery fern leaf behind her. With the crystal swirls on the side, I felt this called for the celebrate rub on that I used in the left corner. This could be for anyone for any occasion... but it is sure to be a keeper!
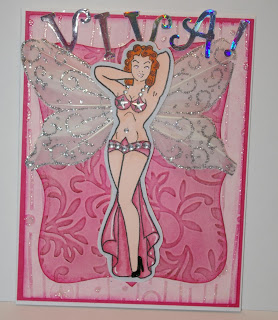
For this Bombshell lady, I colored her with copics as well and
then I used gems for her outfit and glitter pens to accent the lightest pink background paper. I added the feather wings that I got at a local craft store... they had some glitter on there... but I HAD to add more! Next, I die cut the word VIVA.I added a pink cuttlebugged background that reminded me of a curtain that you might find in a burlesque show as i am SURE she is an entertainer! And here is our Bombshell in all her glory! I loved working with these images... I love ALL kinds of stamps and images... but these little ladies really were fun to use because I got to really be creative and "think outside the box".Thanks for stopping by and I hope your day is Da BOMB! (Bombshell that is!)

Saturday, January 9, 2010

One Stamp, 3 Seasons and TIME TO SHOP!!!!


I LOVE getting new stamps. Especially this one... Tree with Snow (m114) one of DRS's New Releases... available for purchase January 9th...That's TODAY!!!
When I got my hands on this one... I knew what I was going to do.
I used different techniques and textures to show different seasons. The first one, I used a sponge to add the leaves and the grass. Then i used white glue and Flower Soft to add the texture and the look of flowers and leaves. This card would be great for spring OR summer. This was a quick card to make and I love the soft look of it. Perfect for that special person,male or female in your life...

For this card,I used vellum and copic markers. I colored on

the BACK of the vellum and then blended the colors with a blender pen made for the copic markers. Then I turned the paper over and stamped the image on the FRONT. I colored the tree and the fence with copic markers as well and then I used my die cuts to make the shapes. I mounted this on white cardstock to show off the background colors. This could be morning or evening...late fall...early winter before the snow flies...ANYTHING!!!How is that for variety? and I am not even DONE yet!!! I have one more card and season to go!

For this card, I stamped the image on white cardstock.Next, I sponged the background and the edges, I added the sun and THEN came the snow!!! I used liquid applique for texture and dimension and then I added stickles for the glimmering snow effect that is coming from the gorgeous bright sun! I used a glitter pen on the fence wires to make it look like snow fell on them as well.I adhered this to an embossed paper that I also sponged and here is the winter card. I LOVE the versatility that this stamp offers. It could be used for a varitey of occasions as well... This is a must have for every stampers collection! I guarntee this will see TONS of ink! Thanks so much for stopping by and remember that all of the fantastic new releases will be available for purchase of the DRS website beginning January 9th... TODAY!!!

Thursday, January 7, 2010

An Oldie But a Goodie!


In more ways than one!!! Yesterday,the Paper Makeup DT was chatting about age and I came across Dreck...and that was pretty much the look I had on my face when I turned 40! I made this car a looooong time ago and I just thought is was appropriate given our choice of chatting yesterday! I used copic markers, SHIMMERZ and ribbon ,as you can see...
Well...that is it... pretty short and sweet... but just one more thing... 40 is NOT that bad!!!I am 2 years into it and that look has gone from my face... mostly!

Tuesday, January 5, 2010

I can TOTALLY relate!


They look so innocent...until you look at the sentiment! This made me laugh out loud! I love that sentiment and I thought it fit perfectly with these little ladies. this was a pretty simple card. I stamped the image in black, matted it and the used pop dots to lift it off of the cuttlebugged background. Then I tied a knot with this awesome ribbon from SU and added the sentiment. all of the stamps are from ART IMPRESSIONS. They have some amazing stamps with a wide range from fun to funny to totally hysterical. Check them out and have a good laugh! Thanks for stopping by...

Monday, January 4, 2010

Sneak Peek TIme for DRS!


What??? Another stunning new release from DRS??? Can it be! Well... yes it is! We are starting to sneak the new releases... so please take a look at the other DRS girls blogs to see what they are up to as well!
This was an easy and simple card to make and I LOVE LOVE LOVE the layout! I used a sketch from SCS... they help me get "unstuck"and Lord knows... DRS always has a stamp that will work PERFECTLY with any sketch! This was the stamp that I chose... I colored the flowers with all different shades of pink Copic markers and then I put yellow stickles in the flower centers... (love my bling!) Next, I tied the ribbon around the front of the card and finished the sketch with the triangles of pink and black. Simple... but so pretty! Keep an eye out this week for more sneak peeks from DRS... Thanks for stopping in!

Saturday, January 2, 2010

Things are POPPING up all over!!!


I was having my snack tonight and I thought of my DRS Designs stamps!!! I am ALWAYS thinking about stamping!!!(LOL) anyway... I made this super cute wiper card complete with embossing,ribbon and a fun surprise of a pop up bowl of well... POP corn! I embossed the popcorn background on yellow paper and then I layered the sentiment onto red paper and added some spunky white dots to set off the embossed popcorn. on the next picture you can see that when you pull the opposite sides of the card... a bowl of popcorn pops up. With all of the popping going on... I simply HAD to used these cute popcorn stamps! For the small yellow strip, I embossed the paper for texture. For the white paper, I scalloped the edge, tied a ribbon and added red dots to carry through the color! It is great to be back to stamping ans sharing and I sincerely hope that you all enjoyed my post today! Happy Saturday!!!

Friday, January 1, 2010

HAPPY New Year Indeed!!!

... with the focus on the HAPPY! I am back with my design teams and I am looking forward to a great year filled with creativity and joy! My son is almost 6 months now and my darling daughter is going to preschool and loving it! My Hubby is even more wonderful if that is possible and my precious mother is never far from my daily thoughts. Her favorite phrase "life goes on" is what keeps me going... that and the love of family and friends! Tomorrow will be the first post on the DRS Designs blog for me in a LONG time and I am hoping that you will all go over there and check it out! A blessed New Year to you all !