Sunday, September 28, 2008

DRS Challenge:Bag Topper and Matching Gift Box Tutorial

Well, Here is it... MY FIRST EVER TUTORIAL!!! Please leave some feedback for me and let me know what y'all think... here we go!
These are the supplies I started with. SU cardstock, a plain paper bag and box from the craft store .The bag is 8 x 10 inches and the topper is 9 x 6 inches...
After I cut the 9 x 6 paper, I folded it in half and laid it on the bag to see where it would look right... then I measured in 2.5 inches from the right and 2.5 inches from the left. I put a dot at each measurement to get ready to cut the slot for the handles.

I cut down 1/4 inch at each dot and then connected the two cuts with my paper cutter. This will allow the handles of the bag to fit through the slot.Next, I randomly stamped the pumpkin image from DRS all over the front of the bag topper
Then, I cut two ovals with my nesties in coordination colors,
stamped my sentiment on the yellow one and used my embossing and glitter pens to decorate the ovals.

I got out my trusty crop-a-dile and set copper eyelets in the front and back of the topper to allow a place for ribbon to be tied! Here, I used large copper eyelets.
I inked the edges of the box with orange ink so when my paper is on the box, it will blend in and match a little bit better. I also think it looks more finished this way! 
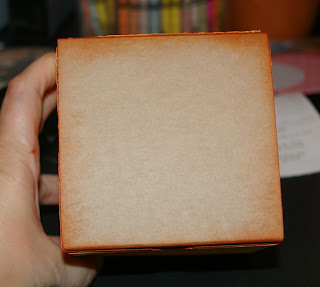
I ran the paper for the sides through the cuttlebug and inked the design with orange ink to show off the embossing on the paper.
I stamped this gorgeous image from DRS on the front panel and colored it with chalks... I LOVE this image and how Fall like it is! I can smell the turkey roasting and the cider mulling!!!

AND... here it is! I hope you like it! This is SOOOO simple to make and this way I don't have to used tissue paper in the gift bag.(I NEVER can make it look right!) I really like how the box and bag coordinate and I think this will make a lovely gift to present to your Thanksgiving hostess or anyone you are thankful for! Think how darling this would look for Christmas as well! Enjoy your day!


Friday, September 26, 2008

Cheers to Friday!


This card is pretty straight forward. I cut squares and mounted them on green cardstock to accent the patterned paper. I stamped the images on them and colored them with copics. For texture and fun , I added crystal effects in the drink part of the image. I highlighted the straw,the stirrers, the umbrella and the bubbles in the champagne with glitter pens. I used my cuttlebug to cut out the ribbon slide and punched out the circle. I used a marker to ink the word "cheers" and put that in the circle.
This was a really simple card that was quick and fun to make. I love the look of the crystal effects... it makes the drinks look shiny and wet...REFRESHING!!! And as for the glitter... well... what can I say??? That is the best part! Thanks for looking and may your champagne ALWAYS be bubbly!

Wednesday, September 24, 2008

Primas, Patterned Paper and Polka Dots!


This was for SCS sketch challenge number 175. I keep a binder with all of the sketch challenges in there so if I get a "block" I can unclog by looking at the sketches! I just printed them out and put page protectors in a 3 ring binder and I keep adding the new ones.
This was a really fun one to do... I think because I never use circles! I cut a piece of patterned paper and them stamped this image from SU Garden Silhouettes in black. I cut out my circle and cut it in half, inked the edges in black and mounted it on the black cardstock. I inked the edges of the patterned paper and adhered that as well. I then took an embossing pen and added all the dots! I punched out the 6 circles and put black brads in the middle of them, then I added the ribbon and the flowers that I layered.
And there it is ... my SC175... I hope you like it as much as I do... it is kinda artsy for me... but I DO love the look... just had to get outta the box!!! Now you all, it is your turn... get out of the box and lets see what ya got! thanks for stopping by!

Tuesday, September 23, 2008

SPOOKY CORNFIELD!!!!!


I made this card with stamps from DRS designs. I used my brayer and a spectrum pad for the background. I brayered the sky on glossy cardstock then inked the edges in black. I stamped the tombstone on grey cardstock and cut them out and inked them for some texture. I stamped the cornstalks onto the glossy cardstock. Be careful when doing this... glossy cardstock can be slippery!!! Just stamp up and down...dont wiggle or rock the stamp... it will not have a crisp image. I arranged the tombstones on the cardsock and them trimmed the edges off. I used pop dots on the one in front. I used my white gel pen for some highlights and added black dots around the outside of the card...for fun!
I stuck the bat on with glue dots... he is sparkly and adds just the right SCARY touch! (and puls... I am pretty batty myself!!!) Hope you like it!

Monday, September 22, 2008

Halo Bella... You're an angel to me!


Simple card... not real tricks here... but I just love how soft this looks! I have been crazy creating things for fall,which I LOVE, but I was craving some softer colors. I used stickles on the wings, colored her with copics and cut the pink rectangle with my nestabilities die.
I love the hopefulness in the sentiment... I don't know about you... but that gives ME all the hope I need! Angels ARE waiting on your prayers... and look how happy she is...
ANYWAY... have a hopeful day... and know that someone IS awaiting your prayers...SO PRAY ALREADY!!!

Thursday, September 18, 2008

Water color leaves...


...so easy and fun!!!
I stamped the leaves background from DRS on watercolor paper with waterproof ink. This background stamp is super easy to use because you don't have to try and line anything up... it always just seems to work. I love all of the background stamps from DRS... have a look at them!Then I water colored them in and cut them into squares. I had to ink around the edges of the squares, cuz that is how I roll... LOVE INKING EDGES!!!It just "finishes" the look...
Then I matted the squares on yellow card stock. I used my cuttlebug embossing folder on the green paper. I stamped the sentiment on white... INKED THE EDGES... AGAIN and mounted it on yellow as well. I tied two different organdy ribbons on the bottom of the card for some texture.
This card makes me want to stay at home and have hot cider! The leaves in Charlotte don't really change till like November... so I just had to create my own... and what fun it was!

Tuesday, September 16, 2008

DRS pumpkin shaker card...


This is a card that I made with the new DRS Halloween stamps. The pumpkin is a current stamp... but the sentiment is a new release and available for purchase beginning September 15th. Oh wait... it is the 16th... what are ya still doing here? do to DRS and get the new Halloween stamps... I will wait...
OK... got what ya "need"? Let me tell you about this card. It is a shaker card... how fun is that? I removed the eyes, nose and mouth from the pumpkin and put a piece of acetate behind there so the goodies would not slip out. Then I used some double sided sticky foam tape to seal in the shaker stuff and adhered it to the card. If you take a look at the other picture... you can see all the stars in Jacks eyes... I think her loves Halloween as much as I do!
I colored the pumpkin with Copic markers and I sprayed some ink to make him look a little bit speckled... then I inked the edges of all of the paper and assembled it! Hope you enjoy it...

Monday, September 15, 2008

A raondom stamp,10 minutes to myself and copic markers


I have no earthly idea where I even GOT this stamp from, but I loved the "retro" look of it AND I know it was on sale! I used my Copic markers to color the ornaments in, and added some extra dots to it just to make the wreath fuller. Then I colored the bow, added some glitter with a glitter pen and mounted this on mulberry paper with gold and silver foil bits in it. I mounted all of that on SU brushed silver cardstock and added the little gems in the corner. I LOVE how this came out AND the fact it was super easy to make! I need to get a jump on my Christmas cards as it is not THAT far away!
Have a great day ladies... and ALWAYS look in the sale bin...

Sunday, September 14, 2008

DRS Challenge number 4...ATC to Full card!


This card was made for DRS design challenge number 4. A while ago, we all made ATC cards and then saved one of them. The Challenge this week was to make the ATC into a full card... so here is mine! I used the blue cardstock for the back and sponged the edges in blue and then black. I used the flower die cuts in the corners and a large scalloped oval for a matt for my ATC.Then, I got out the white gel pen and carried on the dot theme.I am really pleased with the way this turned out! If you would like to play along with this weeks challenge... even if you don't have an ATC laying around... PLEASE do! They are fun to make and it really challenged me to get every element I wanted onto the small 2 1/2 inch by 3 1/2 inch space. Then trying to incorporate it into a full card and carry on the themes... ANOTHER challenge for me!!!
This was really fun to do and we hope that you will play along...
Check out DRS designs blog for the details and to see what the other designers did as well! thanks for stopping by!

Sunday, September 7, 2008

an Inspiration... with a little DRS twist!


I Love the chalkboard technique and I loved the image on the tutorial on Splitcoaststampers.com, so I put a DRS spin on it!
I used images from DRS, the butterfly,the "Hello" and the branch. I copied the colors and the layout from the tutorial and here is what I came up with! I really like the color combo and the layout of this card. This technique is so easy and fun to do! When you put the chalk ovet the white craft ink... it is like MAGIC!
I enjoy the techniques and how creative you can get with them... I just enjoy anything stamping... it is my Passion...
Well, Y'all have a great night and a better tomorrow. Thanks for stopping by!

Thursday, September 4, 2008

Pearl-Ex and Primas and Polka Dots!!!


Well... that about sums it up! I NEEDED some color in my day and I will say that is JUST WHAT I GOT!
I knew I was gonna use this stamp from DRS designs to make a bold,bright fun card... so I put my thinking cap on and here it is!
I dug out the Pearl-Ex,versamark ink, some brightly colored paper and just had a hey day! I cut the pink and green cardstock with my Nestabilities and for the yellow and the black cardstock, I just used my cutter. I stamped versamark ink on the green triangles, the black background cardstock and the butterfly image. Then I took some Q- tips and Pearl-Ex and just started adding color by swirling onto where the versamark was stamped. When I was done adding the color, I used a Swiffer sheet to wipe away the excess Pearl-Ex. (... and YOU thought they were just for cleaning! My hubbie thinks I am cleaning because we go through so many of them...)
To get the tri-color look for the butterfly , I started in the center with the yellow, added the pink and then put the green on the outside. I got out my white gel pen and added the dots all over the scallops. I used a glitter pen for the corners...gotta have my bling! For the last added touch, I layered 3 primas in matching colors, put a fun brad in the center and adhered it to the card! This was just so summery and fun for me! I love the Pearl-Ex shimmer and the bold design of the butterfly really shows it off well.
I hope this added some color to your day...so go forth and be shimmery!

Wednesday, September 3, 2008

No Orange on THIS Halloween card!


I have had this skull image for a while and I thought of a way to use it! FINALLY!
I embossed it with pale pink embossing powder,used my circle and scallop punches form SU and some fun ribbon that I "found" in my craft room. (Things are never really lost in there... just piled on top of!) I used one of the new CB embossing folders and added the sentiment. I sponged over the web with some silver encore ink. I added dots with embossing pens and jellyroll glitter pens and there you have it! I wanted to make something for Halloween with any color but the usual for Halloween... Orange,green and purple. I had to have the black... but the pink really puts it out there! Try to do something out of the norm today... I love the feeling of BEING DIFFERENT! You never know who you will inspire!

Monday, September 1, 2008

My first EVER artist trading card...


...well, what do you think? I thought it would be impossible to make one of these given the space, 2.5 inches by 3.5 inches. So I put my thinking cap on extra tight, got out my DRS stamps and went to work. I chose image number K662 and just used the large flower. Here is what I came up with. i colored the image with copic markers, added some velvet ribbon and my first ever ATC was born! I used my nesties for the scalloped oval, my Marvy punches for the other ovals and then i pierced the daylights out of this! I used a teeny little nestie for the small "hello" oval and added a rhinestone in the middle of the flower. This was fun to make and I really had to challenge myself by making something so small. If you want to play along, Check out DRS Designs blog for their challenges and see what you can do. Be sure to post a link so we can all see your creations! thanks and have a great night!